Devices | All Devices
This tab provides a list of your registered devices along with important details:
- Connection Status
- Red icon - the device is not connected to Ayla Cloud.
- Green icon - the device is connected to Ayla Cloud.
- Gray icon -the device has not connected to Ayla Cloud and is not activate.
- ID - the Ayla-assigned ID provided when you registered the device.
- DSN - the customer Device Serial Number.
- Product Name - a user-friendly device name.
- Model - the model number of the Ayla module.
- OEM Model - the model number of the customer's host application board.
- SW Version - the software version associated with the device.
- User - the end user name associated with the device. Refer to End Users for more information on user information in the system.
- Connected At (UTC) - the time the device last connected to the Ayla Cloud.
|
|
If you are a customer in the EU, the GDPR (privacy) feature should be enabled so that Personal Identifiable Information (PII) is not shown. When GDPRGeneral Data Protection Regulation is enabled, personal information is replaced with a UUIDUniversally Unique Identifier. |

This tab also enables you to accomplish the following tasks related to your devices:
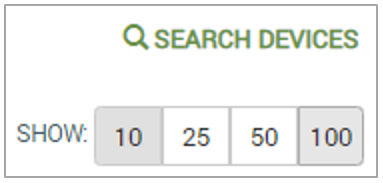
By default, 10 registered devices are listed on the All Devices tab, but you can use the Show option in the upper right corner of the page (example below) to display as many as 100 devices per page.
You can also search for devices by the device details or device properties, as follows:
- Click SEARCH DEVICES (upper right corner) to open the Search dialog box. By default, it shows the By Device tab:

- For ID, type Ayla-provided ID number.
- For DSN, type the customer Device Serial Number.
- For Product Name, type a user-friendly device name.
- For SW Version, type the software version associated with the device, and select the appropriate option from the drop-down list (==, !=, like, not like, in).
- For Device Type, select one of the following options in the drop-down list:
- Wifi (wi-fi devices only)
- Gateway (gateway devices only)
- Node (devices only)
- Node (local devices, i.e. PaaG)
- For Model, enter the model number of the Ayla module.
- For User Email, enter the email to use in the search.
- For User ID, enter the user IDs (separated by commas) to use in the search.
- For Connection Status, select one of the following options from the drop-down list:
- Offline (offline devices only)
- Initializing (initializing devices only)
- Online (online devices only)
- For MAC Address , type the IP Mac address.
- For OEM Model, type the model number of the customer host application board.
- For Connect At After (UTC), enter the connected at after date/time.
- For Connect At Before (UTC), enter the connected at before date/time.
- For Activated At After (UTC), enter the activated at after date/time.
- For Activated At Before (UTC), enter the activated at before date/time.
- For Provisioned At After (UTC), enter the provisioned at after date/time.
- For Provisioned At Before (UTC), enter the provisioned at before date/time.
- For Unique Hardware ID, enter the IP of the PaaG device.
- For Status, select one of the following options from the drop-down list:
- Activated - if the device is activated.
- Registered - if the device is registered.
- Provisioned - if the device is provisioned only and has not been activated.
- For the Sort by display filter, select one of the following options from the drop-down list:
- ID
- OEM
- OEM model
- DSN
- Connected At
- For the Order display filter, select one of the following options from the drop-down list:
- Asc for ascending
- Desc for descending
- Click SEARCH to start the search and close the dialog box.
- Review the search results in the All Devices tab.
- To search by device properties, click the By Properties tab after opening the Search dialog box in Step 1. Refer to the following example of this tab:
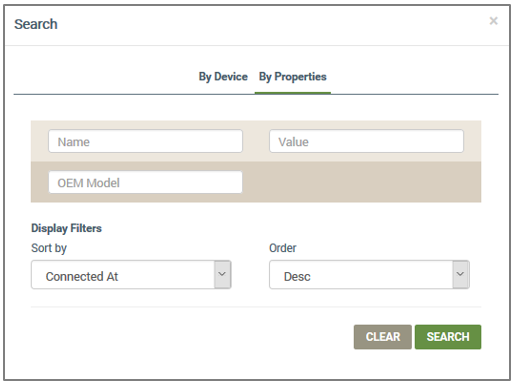
- Enter your search parameters for device properties as follows:
- For Name, type the property name of the host application on the device.
- For Value, type the value of the property.
- For OEM Model, type the model number of the customer’s host application board.
- For the Sort by display filter, select one of the following options from the drop-down list:
- ID
- OEM
- OEM model
- DSN
- Connected At
- For the Order display filter, select one of the following options from the drop-down list:
- Asc for ascending
- Desc for descending
- Click SEARCH to start the search and close the dialog box.
- Review the search results in the All Devices tab.
- On the All Devices tab, select the checkbox for each device that will be part of the new Group:
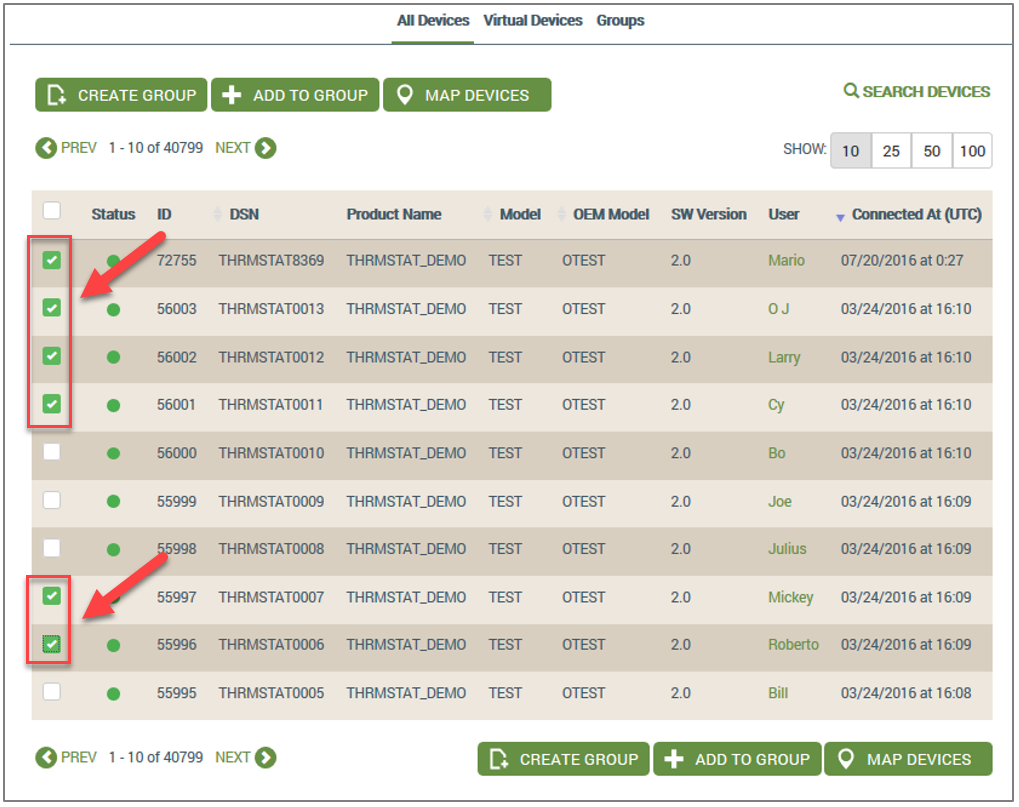
- Click the CREATE GROUP button to open the Create Group dialog box (shown below):
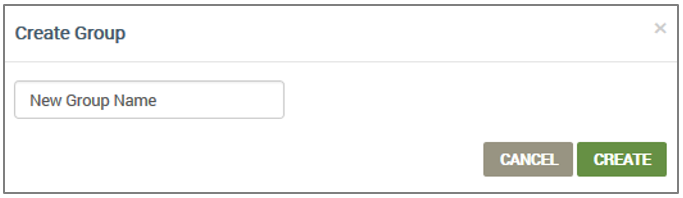
- Enter a name for the group.
|
NOTE |
Valid characters for the group name are A-Za-z0-9_-. |
- Click CREATE to add your new group of devices to the table in the Groups tab, orCANCEL to close the dialog box without saving.
- On the All Devices tab, select the checkbox for each device that will be added to the existing group:
- Click the ADD TO GROUP button (shown below) to open the Edit Group dialog box:
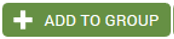
- In the Edit Group dialog box (shown below), click the group (to which you wish to add the devices) in the drop-down list.
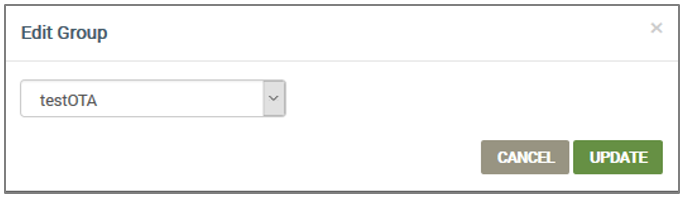
- Click UPDATE to add the devices to this group.
- On the All Devices tab, select the checkbox for each device for which you wish to view the geographic location.
- Click the MAP DEVICES button (shown below) to open the Edit Group dialog box:

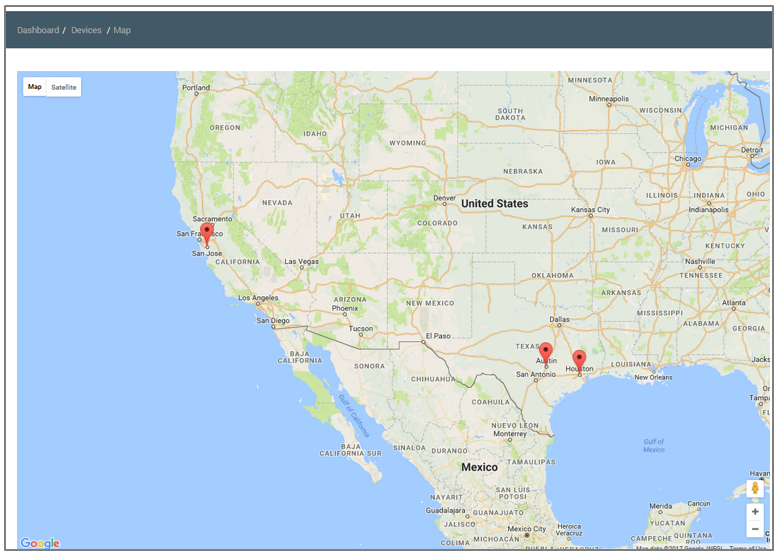
- To show details on a mapped device, click the device location pin on the map to open the Device page shown below.
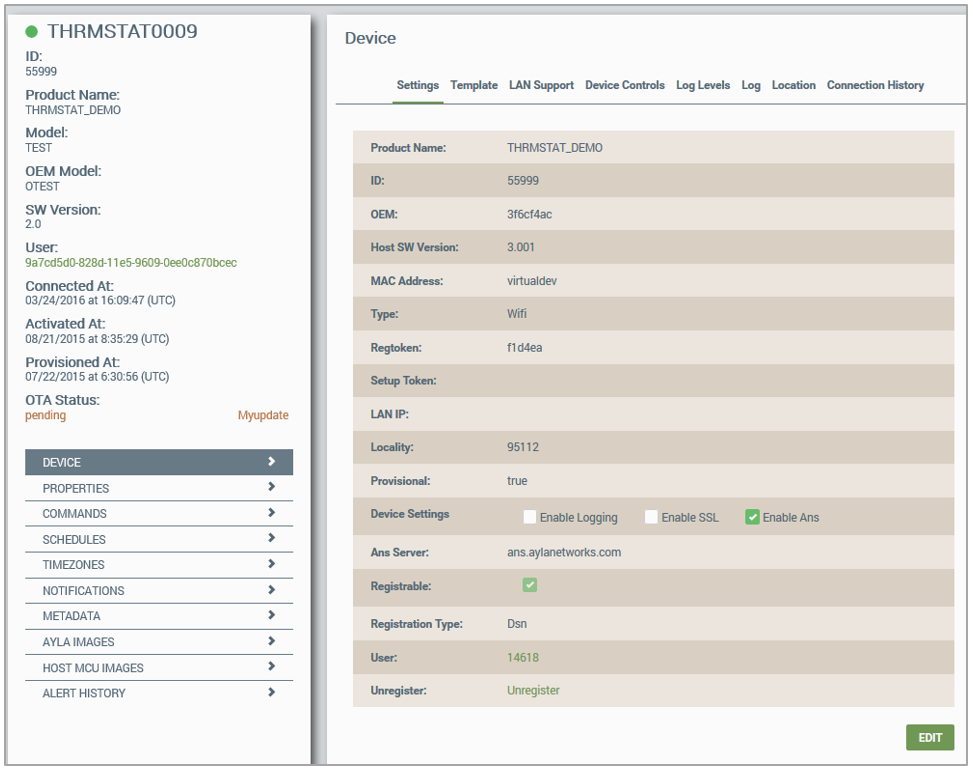
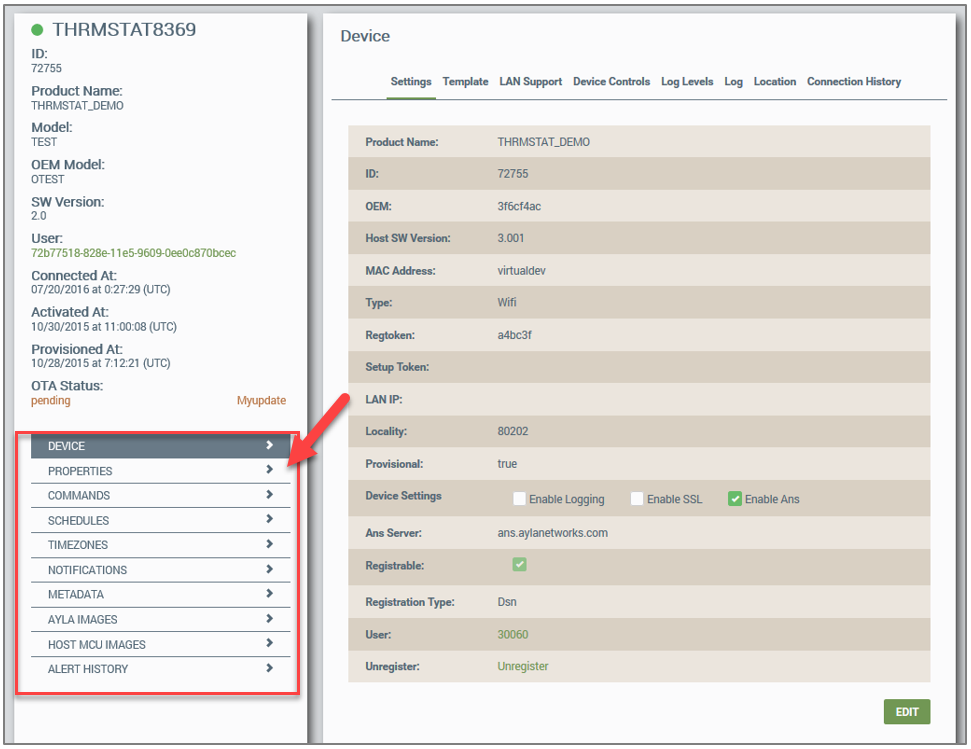
- On the All Devices tab, click the device you wish to review or edit to open the Settings tab of the Device page, as shown in the example below.
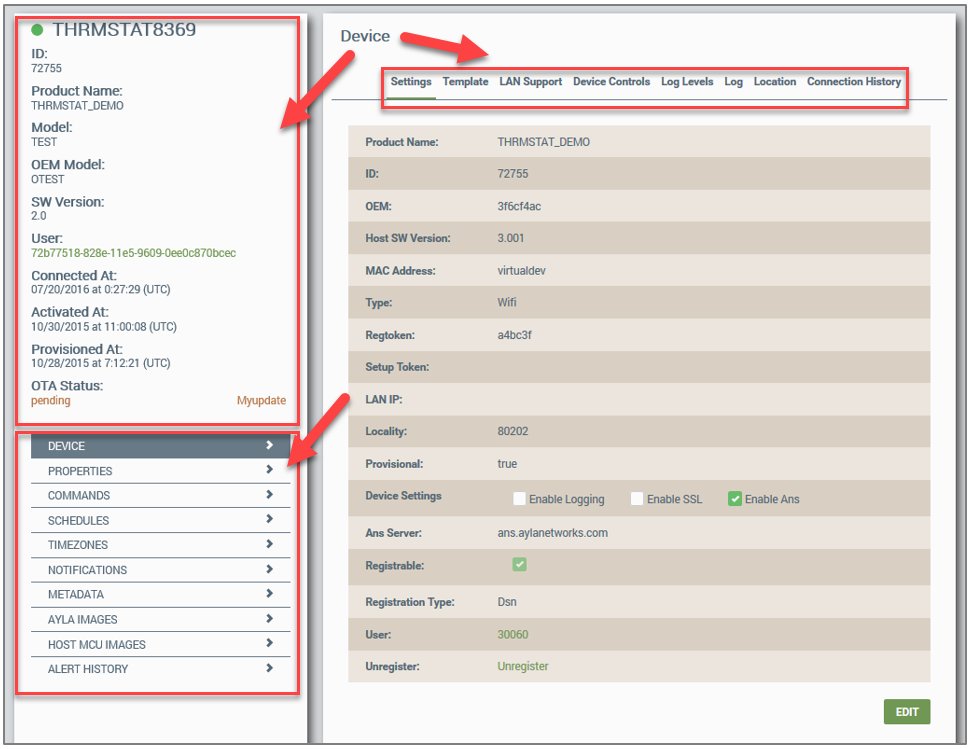
Also in the example above, notice the following main areas to edit and view information on the device:
- 9 tabs across the top of the right side of the page that provide device details
- On the upper left side, high-level identification and connection status on the device (this information remains visible from all device detail tabs and device feature pages.)
- On the lower left, a navigational panel to view and edit device features; each feature has its own configuration page.
- Click the Edit button at the bottom of the Settings tab of the Device page (right side) to change the device settings.
|
NOTE |
Notices that you can only edit some of the fields on the Settings tab. |
- For Product Name, type a user-friendly device name.
- For Device Settings, select or unselect the checkboxes as follows:
- Enable Logging - If selected, the device sends logs to the Ayla Log Service, and the log details are maintained for 30 days. This is useful for diagnosing field problems.
- Enable SSL - This is no longer used. All Ayla Cloud communications are SSL enabled.
- Enable Ans - This was for Apple Notification Service and is no longer used.
- Skip Ans Server. This was for Apple Notification Service, and is no longer used.
- For Registrable, select the checkbox if you want the device to be registered. The device cannot be registered if this checkbox is not selected.
- For Registration Type, select one of the following methods in the drop-down list:
- Same-LAN
- Button-Push
- AP-Mode
- Display
- DSN
- None
|
NOTE |
For an explanation of the Ayla registration methods, refer to Device Onboarding: Ayla Registration Methods (AY006FOR3) on Ayla Connections. |
- For User, click the UUID link to open the User page for viewing and editing details.
|
|
If you are a customer in the EU, the GDPR (privacy) feature should be enabled so that all Personal Identifiable Information (PII) is not shown. When GDPRGeneral Data Protection Regulation is enabled, you must click continue in the message box that displays to open the User page. |
- For Unregister, click the link and then the ACCEPT button in the Confirmation dialog box to unregister the device.
- Click the Update button.
|
NOTE |
Refer to Device | Settings Tab for a description of all the fields on this tab. |
- To edit template settings for the device, click the Template tab on the Device page, and make changes as follows:
- Click the Edit button. Notice the only editable field is Associate a template.
- For Associate a template, in the drop-down list, click the template you want associated to this device.
|
NOTE |
For more information on Ayla template association, refer to the Ayla Developer Portal User's Guide (AY006UDP3) on connection.aylanetworks.com. |
- Click the UPDATE button.
|
NOTE |
Refer to Device | Template Tab for a description of all the fields on this tab. |
- Click the Connection Info tab for connectivity information on the device. You cannot edit the data on this tab. Refer to Device | Connection Info Tab for a description of all its fields.
- To completely disable LAN support for this device, click the LAN Support tab, and then click the Disable button.
- For Keep Alive, click up or down on the spinner to change the value (in milliseconds). Keep Alive is the User Datagram Protocol (UDP) keep alive beacon time, which is how often the mobile app sends a heartbeat to the module to the session active; otherwise, the device will terminate the session.
- For Key Lifetime, click up or down on the spinner to change the value (in milliseconds). The Lifetime option is the time in seconds that the unique LAN-pairing keys are valid. When the pairing expires, the device and the mobile app must reconnect to the cloud before given a new set of LAN keys:
- For Auto-sync, click to select the checkbox to automatically sync variables on reconnection, or click to unselect the checkbox for no syncing.
- Click the UPDATE button.
- For Setup Mode, click:
- On - when selected and Fetch Setup Mode is clicked, the device enters Setup Mode.
- Off - to exclude Setup Mode.
- For Fetch Setup Mode, click FETCH VALUE to send emails with this value.
- For Device Reboot, click:
- Hard - to configure the device to do a hard reboot.
- Soft - to configure the device to do a soft reboot.
- For Factory Reset, click:
- RESET - to return the device to the initial factory state.
- For Logs, click:
- Enable - to capture debugging details defined in Log Levels. The log details are maintained for 30 days. This uses additional computing resources.
- Disable - for no logging.
- For Remote Client, enter the CLI command, and then click SEND to invoke the command on the device.
- For Service (which is only an option from the Development environment of the dashboard), click either:
- Developer - to change the device to the Development service.
- Field - to change the device to the Field service.
- Determine which options you wish to change:
- All - use if you want all log level options to have the same settings.
- Client - use for device-to-service and mobile LAN Agent logs.
- Conf - use for configuration logs.
- DNSS -use for DNS and mDNS server logs.
- Mod - use for logs not included in other logs.
- Netsim - (no longer used.)
- Server - used for internal web server logs.
- SSL - use for SSL or TLS logs.
- Wifi - use for wi-fi logs.
- Log Client - use for logs sent to the server.
- Click the checkbox under the option you wish to configure. If you are configuring all options, only click the checkbox(es) under All. The settings (checkboxes) under all of the options are:
- Info - for general messages, not errors or warnings.
- Debug - for more detailed information than provided in a general message, including error and warning messages.
- Debug2 - for lower level detailed information as well as warnings and errors.
- Metric - for data on connections and internal device performance information.
- Click the UPDATE button.
|
NOTE |
Log details are maintained for 30 days. |
- For Source, click either:
- Device
- Mobile
- For Severity, click one of the following:
- All
- Warning
- Info
- Debug
- Error
- For Lines, click one of the following number of lines:
- 100
- 500
- 1000
- 5000
- For Device Time, click in either the Since (UTC) or Until (UTC) field to change the date and time on the pop-up calendar, show below:
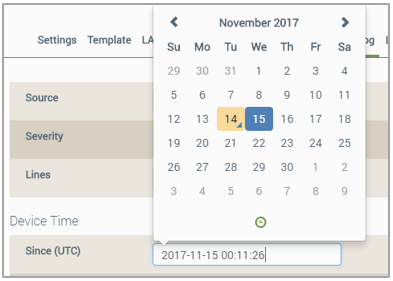
- For Server Time, click in either the Since (UTC) or Until (UTC) field to change the date and time on the pop-up calendar (same as shown above).
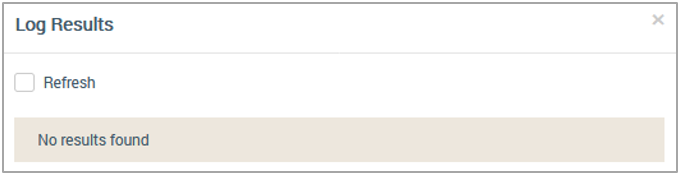
- Click SEARCH to display the information found based on these parameters in the Log Results dialog box, shown below:
- Refer the following example:

- Use the Plus and Minus buttons (shown below) to zoom in and zoom out:

- Click and drag the Person icon (shown below) to the device location indicator (red marker) on the map to show a street view:

- Click Satellite and then Labels to show the area with names.
- Click the Connection History tab to view the date/time that a connection event occurred and the status of the device when the event occurred.
- Click any of the following device features (listed below) in the navigational panel on the lower left side of the Device page (see example below for the location) to view, configure, and make changes.
- Click the linked device feature for description of fields and instructions on how to use the feature page.
See also:Devices, Device Groups, View/Edit Device Details.
How to get here on the dashboard: Click Devices in the Navigation Panel.
Please click here to let us know how we're doing. Thank you.